
On 2 October 2026 my plugin IT Reelsmaker went live in the Claude plugin directory. It passed Anthropic’s security check and review, and version 1.0.0 was published with the Claude Code, Cowork and Claude apps labels. A couple of days earlier we’d looked at how to get a plugin into the Claude directory, and now we’ve published our own. By 21 October the plugin had grown to version 1.20.0: among other things, it now shows a storyboard before rendering, cuts long recordings into a series of clips and can label objects in the frame with callouts. New versions are still waiting for Anthropic’s review before they reach the Claude directory, so for the latest plugin install it from our marketplace on GitHub; the commands are in the installation section.
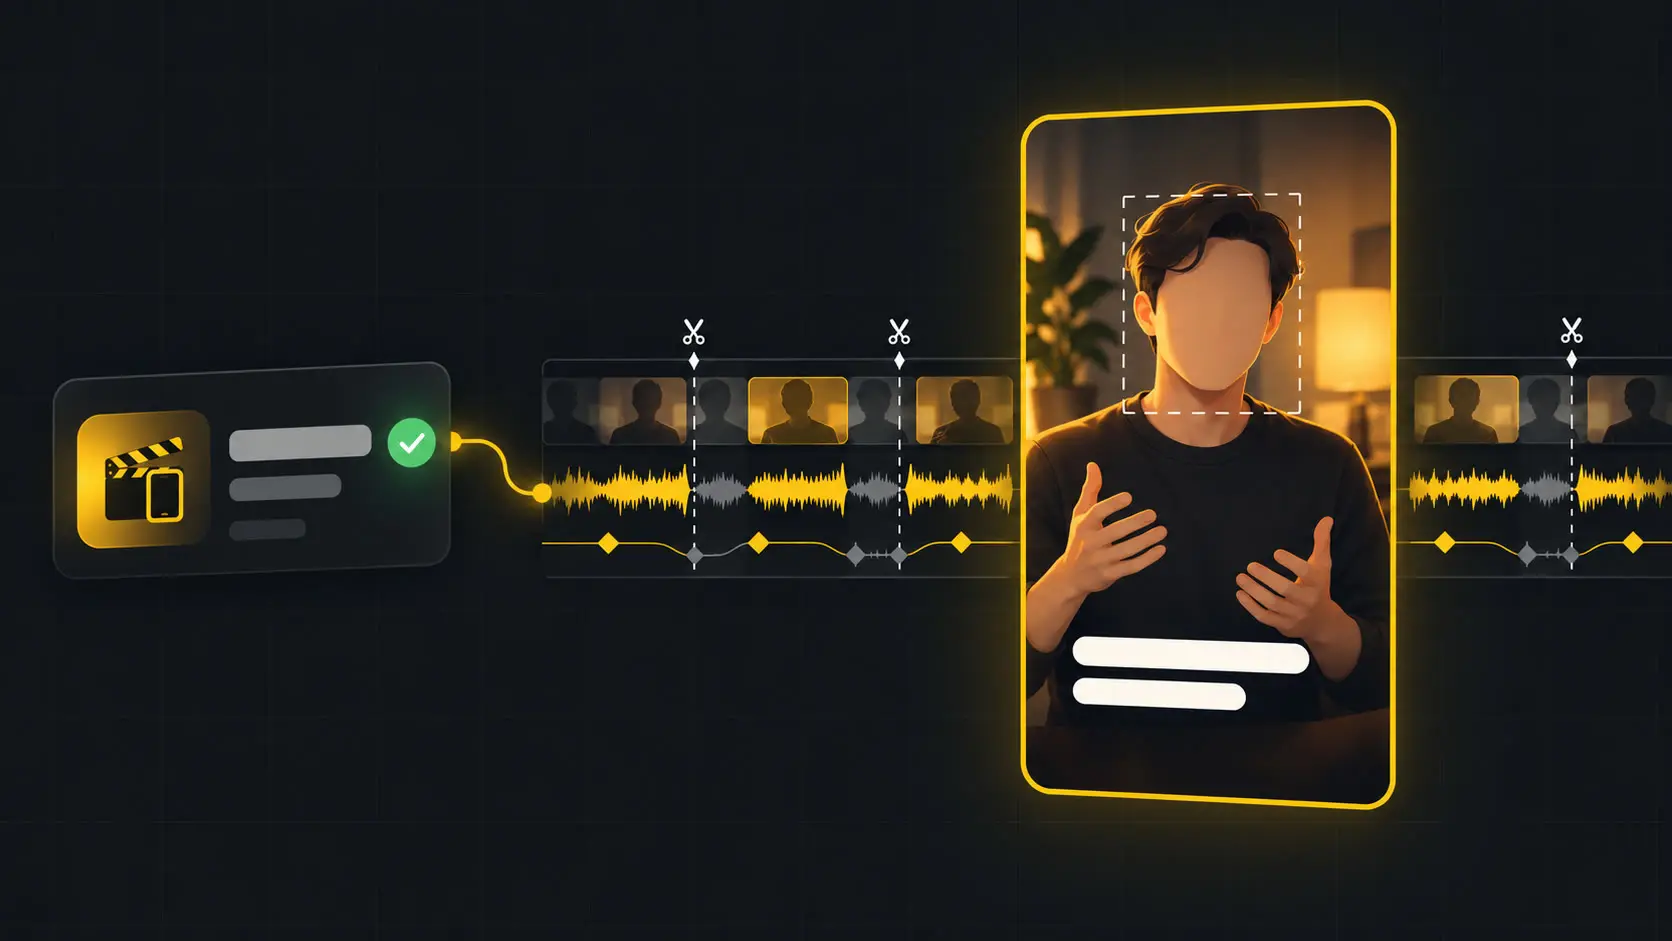
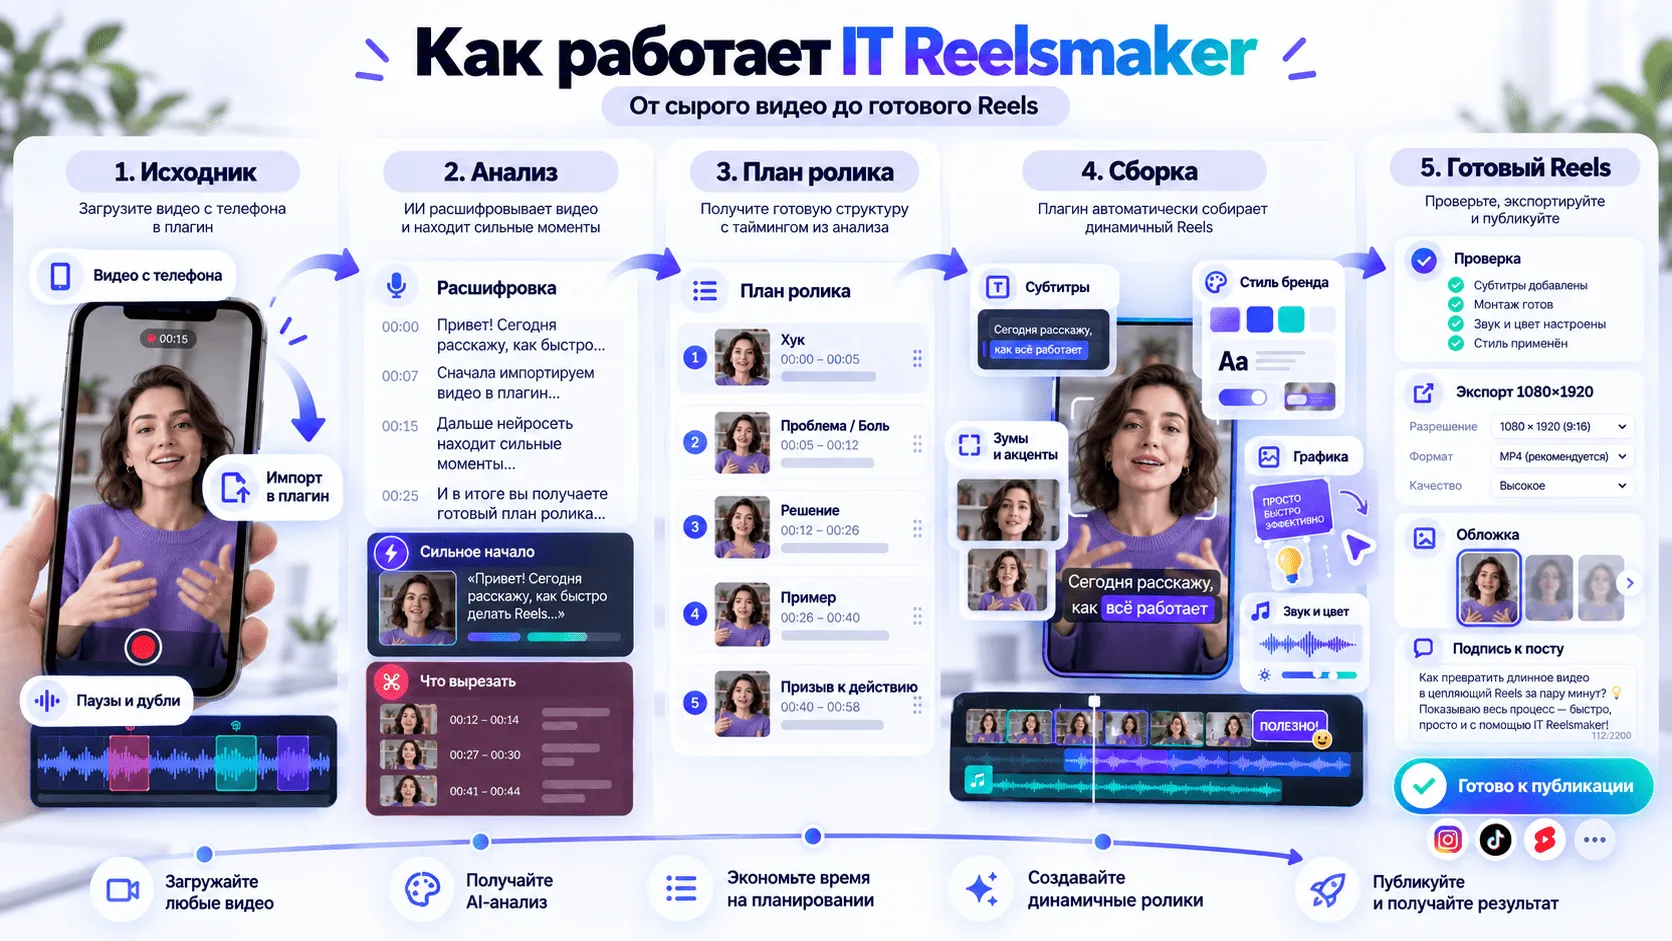
IT Reelsmaker edits vertical videos for Reels, Shorts and TikTok from a “talking head”, a recording of someone speaking to camera. In goes a raw take from a phone; out comes a 1080×1920 master with cuts, subtitles, graphics in your brand colours and levelled sound. Claude Code runs the job, while the editing programs run on your computer: the agent launches the plugin’s scripts and ffmpeg, assembles the video in Remotion from a ready-made set of components and checks the result. It’s AI editing, but the base plugin doesn’t generate video with a neural network: what’s on screen is your real recording.
Who a Reels editing plugin for Claude Code is for
People who film themselves on a phone regularly and spend more time editing than recording: experts, recruiters, owners of small brands, social media managers. The plugin isn’t tied to one company. Brands are kept as separate profiles (colours, fonts, logos, design rules), you can have as many as you like, and before editing the agent asks which brand the video is for. The skill talks to you in your language, while the text on screen follows the language of the video itself.
It was built on real videos. That’s where the numbers you’ll see below come from: loudness thresholds, margins, sizes of text zones. All of it has been tested in practice, not plucked out of thin air.
How AI editing of a vertical video works
The agent’s first question settles the brand, the style and the inserts. The brand is picked from saved ones or created from a name, colours and tone. There are six styles: Marker, Brand, Minimal, Editorial, Bold and Glass. Inserts are only switched on if you want them: B-roll (extra footage laid over the speech), code scenes and memes. The default intensity is moderate.
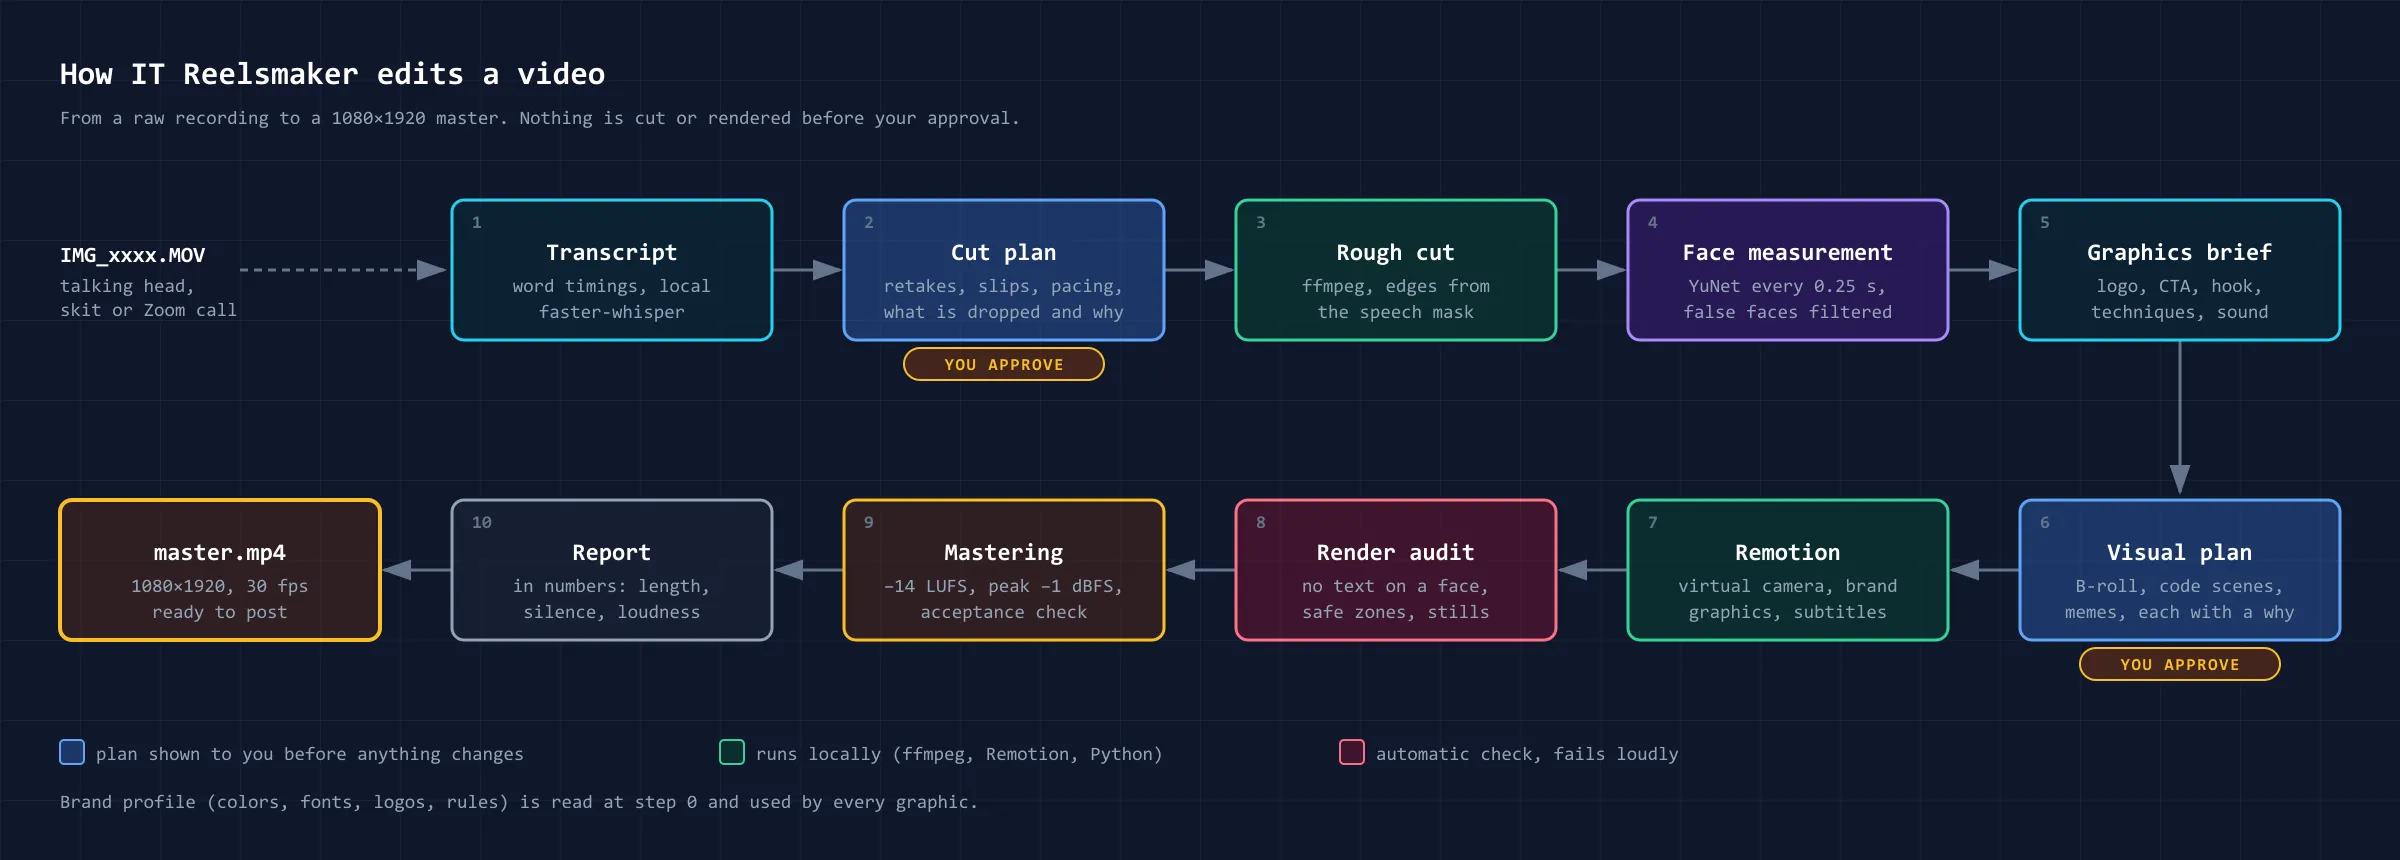
How often the plugin stops for your approval depends on the mode. In quick mode with a known brand there are no questions up front: the plugin stops only at the cut plan and at the preview. Standard mode, the default, adds the first question and the storyboard; full mode adds a question about the video’s profile and the reasoning behind every decision. For a recurring series you can save the settings and the ending of a finished video as a series preset and apply them to the next episode.
Next, the recording is transcribed word by word, and the skill looks for retakes and slips. The agent draws up a cut plan: what to keep, what to remove and why. The plugin doesn’t cut without your “yes”: the plan lists explicitly what was rejected and for what reason.
The plugin doesn’t silently decide how the video starts and ends either. It looks for strong lines in the transcript and offers 2–3 structure options, each with its length and risk: in order, without the slow start, or with a teaser, where a strong line from the middle plays first and then the video runs from the beginning. The ending lands on the takeaway, a call to action or the logo. For a sketch or a dialogue the teaser option is always there. Using the audio, the skill checks which lines cut cleanly and warns you if the teaser gives away the punchline. With the same question the agent gathers the graphics brief: logo, call to action, techniques and sound.
Once you confirm, the rough cut is assembled: cuts, colour with measured white balance, a slight speed-up of the speech, and subtitles already on the new timeline. Then faces are measured across the whole rough cut; more on that below.
The second checkpoint is the visual plan. It’s a table that sets out, by timecode, the line, the main footage, B-roll, meme, transition and the answer to “why”. You see it before rendering, so an unnecessary insert can go before the long render starts.
In standard and full modes the plugin shows a storyboard before rendering: numbered frames of the scenes and inserts on a single sheet. You can ask for frames 3 and 7 to be redone before the full render. All the on-screen text is checked at the same point: is it clipped by the edge, does it overlap other text or a face?
Then Remotion builds the virtual camera and the graphics in your brand colours, the video renders at 1080×1920 and goes through an audit: has any text landed on a face? The final step is sound mastering and a report in numbers: duration, how much silence is left, loudness, which inserts went in and why some didn’t.
Cutting by sound, not by transcript
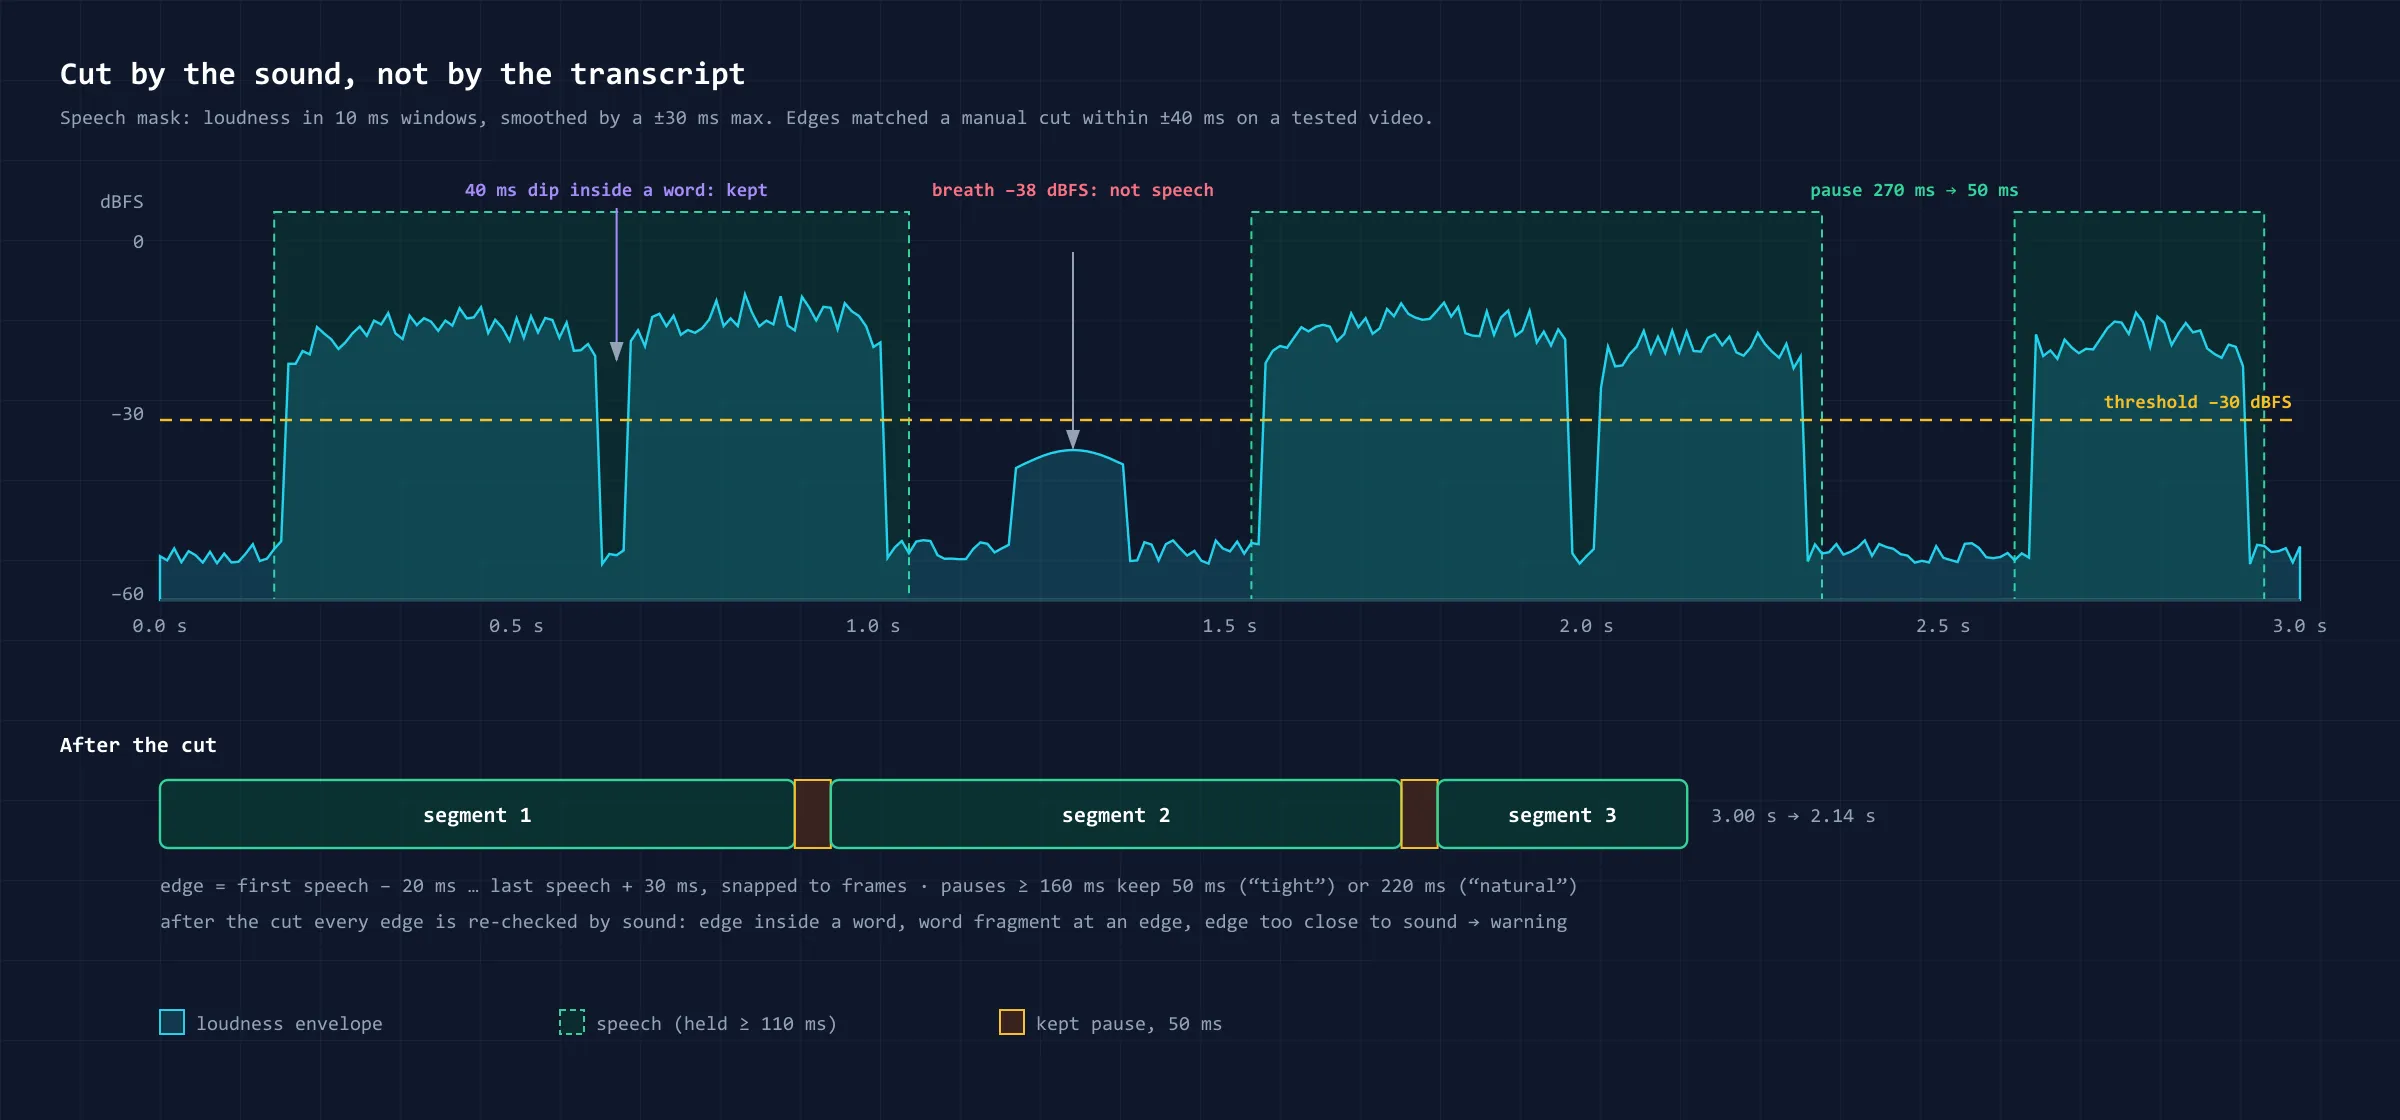
The plugin’s main technical idea is to cut by sound. The transcript tells you what was said, but the recogniser’s word boundaries drift. So the skill builds a speech mask: loudness is measured in 10 ms windows, smoothed with a rolling maximum within 30 ms either side, and only what lasts at least 110 ms counts as speech. A breath doesn’t count as a word, a voiceless final consonant isn’t chopped off, and pauses shrink to 50 ms, or to 220 ms if you want a “natural” density. On a real video the edges of the cuts matched a manual edit to within 40 ms.
The mask also listens to high frequencies, so a quiet final “s” or an initial “ch” stays in the cut. If a short word is said noticeably more quietly than the rest of the speech, the skill doesn’t drop it silently; it names it and asks you to check by ear. A separate trap is iPhone video: the audio track there can start about 0.1 seconds later than the picture, and without a correction every cut would eat the end of the last word. So the plugin analyses the audio on the video’s own timeline.
Retakes are a job of their own. Whisper can merge a repeat into one “stretched” word, and you won’t see it in the text. The skill catches words longer than a second, pauses longer than a second in the middle of a phrase, and words that signal a restart, and rechecks doubtful spots in chunks of no more than 5 seconds. The best take is chosen by the cues a human editor uses: if the speaker said “that one’s good”, the previous take is used; a whole phrase beats a broken one; clothes rustling sounds like speech, so those spots are checked frame by frame.
Subtitles and captions stay off the face
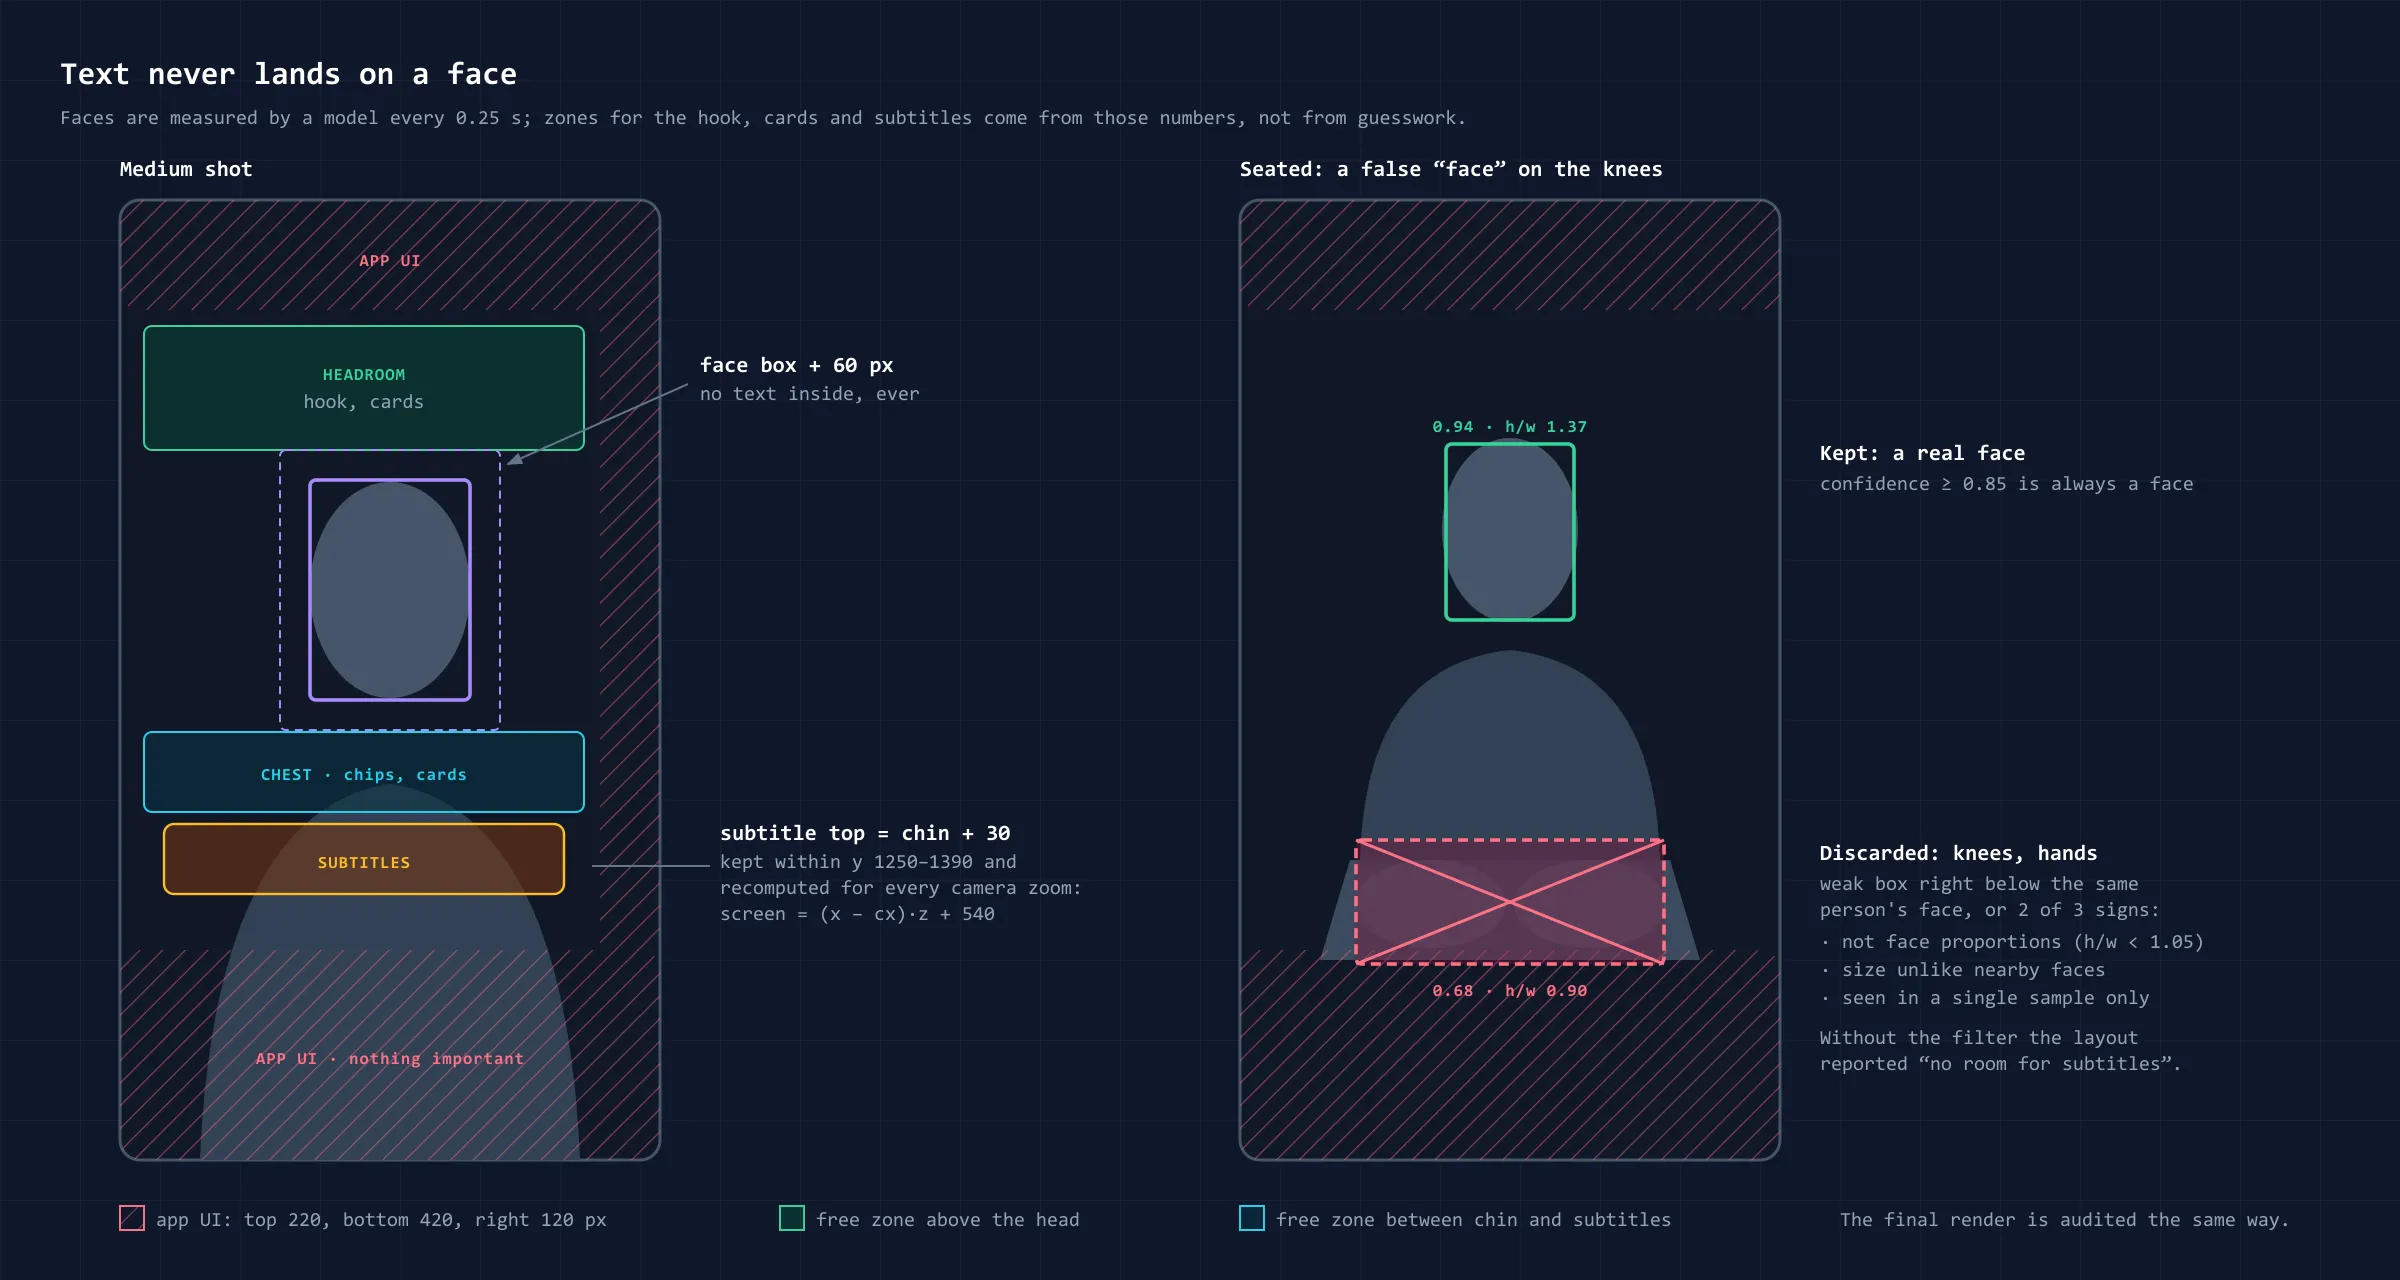
The usual problem with automatic subtitles is text over the chin. IT Reelsmaker doesn’t eyeball the layout; it measures. The YuNet model finds the face in a frame of the rough cut every 0.25 seconds, and from those numbers it works out how much room there is above the head for the hook (the opening line that holds attention) and for cards, how much on the chest, and at what height to put the subtitles so the chin stays above them, taking the virtual camera’s zoom into account. The finished render goes through the same audit, and any overlap of the face with subtitles, cards or memes is reported with timecodes.
The model sometimes sees a “face” in knees, hands or folds of clothing, exactly where the subtitles sit. A plausibility filter discards such hits by confidence, box proportions, position and size, and reports how many it threw out. On a real video it removed all 37 false faces without touching a single real one. A weak box cut off by the left or right edge of the frame, usually a shoulder, also counts as false, and the subtitle height follows only confidently detected faces. If there’s no free space for a hook or a list over the video, the plugin doesn’t put it on the face; it stops and asks you to choose a spot. With the standard subtitle height, the chin would have dipped into them for almost the entire video.
The model only finds where a face is; it doesn’t recognise people.
The subtitles themselves are split by phrases, pauses and punctuation, and a short word or number isn’t left dangling at the end of a line. In a two-person video they’re coloured by speaker: the first speaks in the regular colours, the second in the accent colour or the colours set in the brand.
Subtitles can also be in another language. Claude translates the phrases right in the session, in the brand’s voice and as concisely as the speech itself, and the plugin checks the reading speed and fits the translation to the rhythm of the speech. For platforms it prepares .srt files, original or translation, with lines of no more than 42 characters.
Camera, graphics and sound mastering
From a single static take the plugin makes a virtual camera: wide, medium and close-up shots, a sharp push-in and pull-out. The zoom limit is calculated in advance from the resolution and the frame, so the picture doesn’t lose sharpness. On pauses there’s a hard cut instead of a smooth transition.
Graphics are tied not to a second but to a word: if the video is re-cut, a card still appears on the right line. A late fix, a word in a subtitle or the text on a card, doesn’t need a full render: only the stretch between keyframes is redrawn and spliced in without re-encoding. For a one-minute video that’s about a minute instead of 8–10.
Already at the rough-cut stage the plugin levels the speech volume, so there are no jumps between takes at the cuts. Sound is mastered to set targets: a low cut at 80 Hz, two-pass normalisation to −14 LUFS, true peak at −1 dBFS with headroom for AAC. The built-in acceptance check won’t hand over a master that fails. Noise reduction only kicks in when the noise is louder than −50 dBFS. Music sits 15 dB below the voice and ducks under the speech, and the track’s downbeat lines up with the final phrase. Under a key line you can push the music down further without touching the voice. Colour is corrected in two steps: first the source itself, then your own LUT (a colour preset) built from a grade you liked, which you can also take into CapCut. The plugin doesn’t set white balance by eye: it runs frames through the brand LUT and picks a correction that keeps walls, white clothing and other greys neutral. Without this, a preset that mutes blue turned the whole video yellow. In scenes with coloured light (sky and sea in the window, neon) the plugin will refuse a correction that would make a cool picture even cooler, and you can point it to a neutral object by hand: a white T-shirt, a wall or a sheet of paper.
Designed scenes: hook, quote, number, call to action
Besides subtitles and cards, the plugin has ready-made designed scenes: a big hook, a verbatim quote, the main idea in one punch, a number with a counter, a list point by point, before and after, a call to action shown as an action, and a cover. They’re drawn in the brand colours, appear on the spoken word and by default keep the speaker’s face in frame. Chat messages and an interface with a cursor are still experimental; more on those below.
Text in scenes has to stay up long enough to read: at least 0.8 seconds for a short line and 0.3 seconds for every word. Quotes are checked against the transcript word for word, and every number must have a source. A list can also appear over the video without shrinking the speaker: the points pop up on their words in free space above the head or on the chest. If you like, the plugin also writes the post caption. It picks the cover before mastering from a pause in the speech, not mid-word, and the finished master comes out as one file: the cover is the first frame (that’s what messengers show), it’s embedded as the file preview, and it’s also saved alongside as a separate image for manual upload. And if there’s nothing to film, it’ll put together a 15–25 second brand promo from scenes alone, with the brand profile, an end card and mastering. The scene planning method is adapted from the open-source project brag.
Cutting a podcast or webinar into a series of clips
A podcast, webinar or interview of 10–90 minutes becomes a series of vertical videos. The recording is transcribed once on your computer, or existing subtitles are used. The agent reads the transcript in chunks and writes a card for each clip: which pieces go in, the hook, the ending and why the clip makes sense without the rest of the recording. A clip can be assembled from two or three places in the conversation, with the host’s lines removed.
A script checks whether a clip starts mid-phrase, depends on the earlier conversation or repeats another clip. You approve the list once, and the plugin creates a separate folder for each clip with the fragments and the transcript, so speech doesn’t need to be recognised again.
Ready-made scripts and a Remotion kit
The plugin carries all the editing mechanics with it: scripts for the rough cut, sound-based cut edges, face measurement, the visual plan with its checks, B-roll and memes from your folders, code scenes, brand profiles, the cover and mastering. Claude runs them rather than writing code from scratch for every project, so editing is faster and consistent every time. Everything that varies from video to video (segments, speed, colour, transcript fixes) lives in one small cut file. Two cameras running at different speeds are supported too.
The scripts stop on a real problem and say what to fix: if picture and sound drift apart in the rough cut, a quote isn’t verbatim or the master misses its loudness target. They only work inside the project folder and never go online.
In Remotion the video is assembled by the ReelKit component (rough cut, word-by-word subtitles, brand, B-roll, memes, scenes and end card), while ReelCover makes the cover. If you don’t have a Remotion project yet, the plugin creates a starter one with the kit already wired in. On update it checks the kit version and replaces outdated files, keeping backups; it leaves your project settings, brands, plans and scenes alone. A new Remotion project gets a fixed video cache, so rendering doesn’t crash when lots of programs are open and free memory is low.
Every decision comes with a reason
In full mode the cut plan and the final report end with a “Supports” block. There, every decision that shapes the video (structure, pace, shot sizes, text, inserts, colour, sound) sits next to the rule it came from and how far that rule can be trusted. You can also see what wasn’t applied or where the plugin departed from a rule, and why. If you don’t like something in the video, you fix the specific rule, not the whole video.
Editing rules come in three trust levels: your own dated decisions, rules tested on edited videos, and outside advice. When rules clash, the one written for this type of video wins, then the more reliable one. A genuine tie is put to you, and your answer becomes a new rule.
You can collect your own rules in a playbook.md file in the project, as cards with a permanent label, scope, reason, source and trust level. A guide or someone else’s video you want to learn from goes into the refs/ folder and is reconciled with the rule base one rule at a time: matches add a source to a rule, contradictions are shown to you, and anything new is recorded as outside advice. A fix you keep repeating, or call “always do it this way”, becomes a rule too.
You can borrow the movement from a video you like without copying it: the agent breaks the example down by timecode and transfers only the mechanics of the movement into your scenes, with your footage and your brand. Notes on a finished video turn into a “timecode, as it is now, as it should be” table, and only what you asked for changes.
Brand, tone and techniques from the brief
To set up a brand, a name and one to three colours are enough. The skill assigns them roles itself (dark base, accent, light), picks a text colour with a contrast of at least 4.5:1 and fonts that support Cyrillic, and works out which logo is light, which is dark and which suits a corner of the frame. Brand fixes accumulate in its rules and carry over to the next videos. Profiles live in your project folder, not inside the plugin, so updates don’t touch them. Next to a profile you can drop your own documents, a guide to the brand’s videos and a library of calls to action with exact wording, and the skill will read them before doing the graphics. Shared settings for all videos also live in the project.
Every brand has a tone, and there are eight: premium, expert, friendly, bold with humour, warm (medicine, psychology, family), atmospheric (travel, hotels, architecture), tech (software and IT) and energetic sales (shops, launches, fitness). The tone sets the frame for all of the brand’s videos at once: which memes are allowed, how many cutaways a video gets and how loud the techniques are. When you create a brand, the skill shows all eight and suggests the ones that fit your field, and you can switch tone at any time by saying “change the brand tone”; the rest of the profile stays. Profiles created before tones existed update themselves: they get the expert tone, a backup and one line about what changed.
On top of the tone, a video can have a profile, meaning what kind of video it is: educational, entertaining, expert clip, promo or paid ad. By default there’s no profile; it’s switched on when you ask, except for paid ads, which always have one, because the platforms set those rules themselves. The profile sets the video’s parameters within the brand tone (how many inserts, the tone of the scenes, whether memes are allowed), turns on its own rules and brings a checklist. Whatever can be measured (length, a slow start, a single call to action, the brand in the first seconds) the plugin checks itself; the rest is confirmed before you see the rough cut. Formats are ready-made settings too: insight, list, case study, story, sketch, testimonial, job ad, review, event, interview cut, scenes-only video. The format suggests the length and graphics in the plan, and a job ad can have two calls to action. If a brand needs a different tone for one kind of video (say, entertaining sketches for a calm brand), it’s recorded once, and those videos follow it from then on.
In ads, text, memes, the call to action and subtitles stay inside the safe zone of ad formats: subtitles move up above the platform’s caption and button, the corner logo moves down, the brand is checked by the third second, and memes are only allowed with known rights.
Every insert has to answer the question “why”: understanding, a bridge, pace, a hook or emotion. The intensity budget is a ceiling, not a quota to fill. The agent writes insert scenes itself with Remotion components (a diagram, a symbolic object, an interface in brand colours) without paid AI video generation. Memes are matched to the meaning of the line from your own tagging, with a rights check: other people’s GIFs without a licence aren’t baked in, and CC material goes in with attribution.
You can connect your own library of sounds, music and icons to the plugin: a script builds a catalogue of it, and for every sound it records the silence at the start of the file, so a hit doesn’t lag behind the event on screen. No sounds of your own? The repository releases include a starter pack of 260 CC0 sounds (Kenney, OpenGameArt) that you can use even in commercial videos without crediting the author.
Other techniques are only switched on when the brief asks for them:
- a horizontal recording in a window, for Zoom interviews, webinars and podcasts: the template draws a rounded window with a caption on top, the camera moves inside the window, scenes stay in it, and subtitles can drop below the window so they don’t cover the slide;
- a light leak instead of a transition;
- a full-screen key phrase;
- a two-person sketch with a verdict scale;
- 12 ready-made calls to action.
A few more techniques are marked experimental, as they haven’t been tested in a finished video yet: text behind the person on the hook, a presenter over a scene, a phone mock-up with a screen, a slide scene, chat messages and an interface. Callouts on objects belong here too, as in flat and gadget reviews: a dot on a thing in the frame, a line from it and a label with its name. They only work in a static shot (the plan check won’t pass a handheld walk-through of a flat), and the label keeps well away from the face and subtitles. Experimental techniques aren’t in the menu: the agent only offers one when the footage clearly calls for it and writes “experimental” in the plan, and if you ask directly, it does it as usual.
How to install the IT Reelsmaker plugin for Claude Code
The plugin is in the Claude directory, but every new version there is released by hand by an Anthropic reviewer. Right now the latest versions are waiting for that review, and the directory still has an old version, without much of what this article describes. So install the latest version from our marketplace on GitHub: it appears there on release day.
claude plugin marketplace add https://github.com/itpartypattaya/reels-montage.git
claude plugin install it-reelsmaker@itparty
Editing needs local tools, so the intended setup is Claude Code running on a computer with ffmpeg and ffprobe, Node.js 18 or newer and Python 3.9 or newer with the Pillow library. The plugin creates a Remotion project itself if needed. Remotion has its own licence: it’s free for individuals and companies of up to three employees, and paid for larger companies. Word-level transcription uses local faster-whisper; a cloud recogniser is used only if you choose one yourself. Optionally you can add rembg to cut out the figure on your own computer, and the YuNet model with OpenCV for face measurement. The plugin works without them too: footage is taken from the project, inserts are made as code scenes, and faces are checked frame by frame.
When you enable it, Claude Code asks for the project folder, the Remotion project, the asset library and the path to the face model. Anything optional can be left blank and filled in during the first session. After that, just say “edit a reel” or “make a Reel from IMG_1234.MOV”.
For online sources there’s a separate add-on, it-reelsmaker-online, installed from our marketplace with claude plugin install it-reelsmaker-online@itparty. It adds vertical stock footage (Pixabay, Pexels, Magnific), CC memes from Openverse and paid video generation through fal.ai. There are two more paid modes: a more accurate transcription, where OpenAI’s text is laid onto the word timings of the local model (around $0.005 per minute of speech, only after your “yes”), and subtitle translation through the Claude, OpenAI or Gemini API; by default Claude translates in the session for free. You can also take the transcript text from Groq, either directly or as a fallback if OpenAI is out of credits or unavailable (free tier, then $0.04 per hour). That text is also laid onto the local model’s timings, and Groq’s own timings aren’t used: in testing they drifted from the speech. Services with authentication need your own API keys; Openverse works without one. You enter a key in your terminal with hidden input, and it never reaches the chat. The add-on also does figure cut-out on your own server over SSH when the laptop can’t cope: frames go only there and are deleted after the job. Online sources stay off until you turn them on for a video or a project, and the add-on is linked to a project once; Claude does that itself on the first online request. Any download or paid generation waits for approval of the visual plan, which lists the source, size and price.
Installed from our marketplace, the plugin has auto-update off by default. You can turn it on once (in the /plugin menu open Marketplaces, choose itparty and click Enable auto-update) or update by hand:
claude plugin marketplace update itparty
claude plugin update it-reelsmaker@itparty
After an update the skill shows a short “What’s new” note once, on your first edit. The directory version updates itself, but only after Anthropic’s review lets the new version through.
Where your videos stay
The plugin has no server of its own and no telemetry, it collects nothing, and its scripts don’t go online. Videos, transcripts and brand profiles stay in the project folder. What leaves your computer is the conversation with Claude, as in any Claude Code session, including the transcript text and the frames the agent looks at. If you chose a cloud recogniser, the audio goes there. Add to that the usual requests when installing packages, on the first render (Remotion downloads its own browser), and when fonts and models are downloaded. The online sources add-on sends search queries to stock services, prompts and, if you choose, a starting frame to fal.ai, and frames for figure cut-out to your server, if one is set. For cloud transcription the speech audio goes to OpenAI, or to Groq if you chose it (directly or as a fallback); for translation, only the subtitle text goes to the chosen service. Details are in PRIVACY.md.
Open source and feedback
IT Reelsmaker is released under the MIT licence: you’re free to use it, change it and build it into your own workflows. The source code and a detailed description of the algorithms are in the GitHub repository. All the plugin’s scripts are there as well, and what changed in each version is in the CHANGELOG.
If you’ve edited your first video, found a bug or are missing a technique, write to Issues. The plugin is under active development, and feedback is especially useful right now. If you’re curious how Claude’s creative integrations work in general, we have an overview of connectors for Blender, Adobe and Ableton.